
No products in the cart.


 Security policy
(edit with the Customer Reassurance module)
 Delivery policy
(edit with the Customer Reassurance module)
 Return policy
(edit with the Customer Reassurance module)

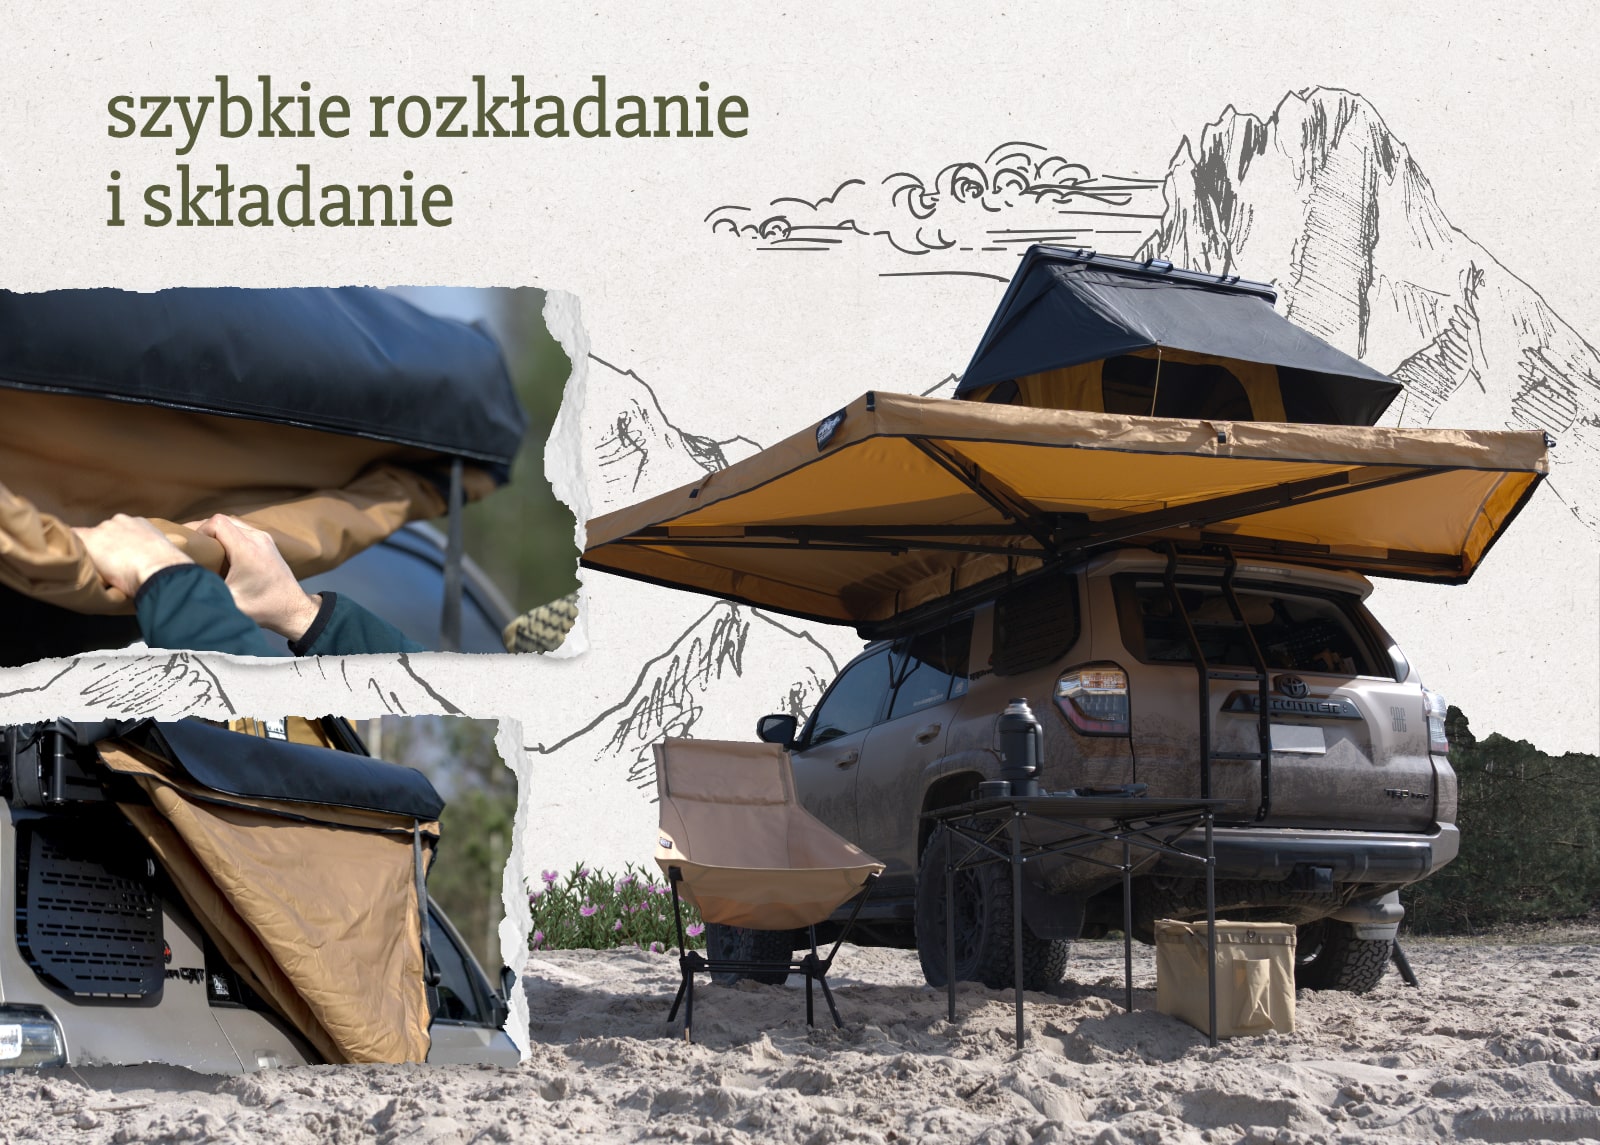
Markiza samonośna BATWING marki OFFLANDER zapewni skuteczną ochronę przed niekorzystnymi warunkami pogodowymi, takimi jak deszcz czy intensywne słońce. Dodatkowo pomoże Ci zorganizować przestrzeń wokół pojazdu szczególnie w te upalne lub deszczowe dni.
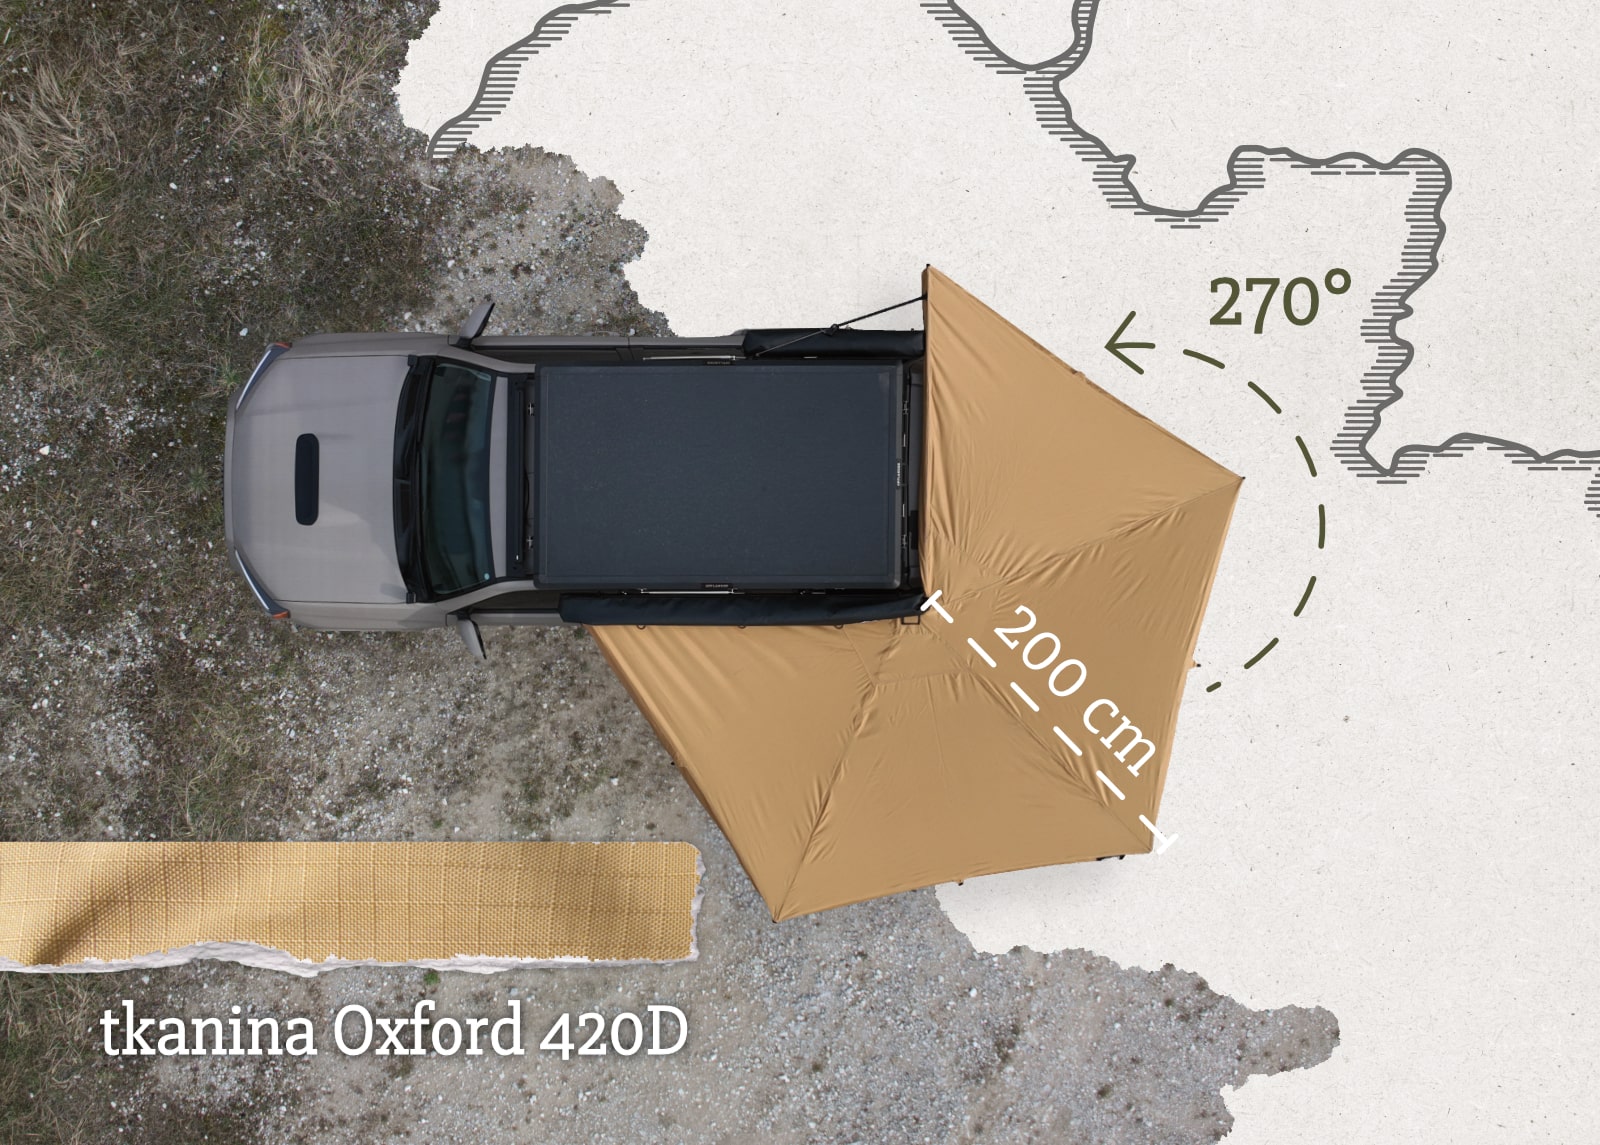
Solidna tkanina Oxford 420D z wodoodpornością 2000-3000 mm oferuje doskonałą wytrzymałość i ochronę przed warunkami atmosferycznymi, przy jednoczesnym zachowaniu lekkości i łatwości użytkowania. Tkaniny Oxford są łatwe do czyszczenia i szybko schną.
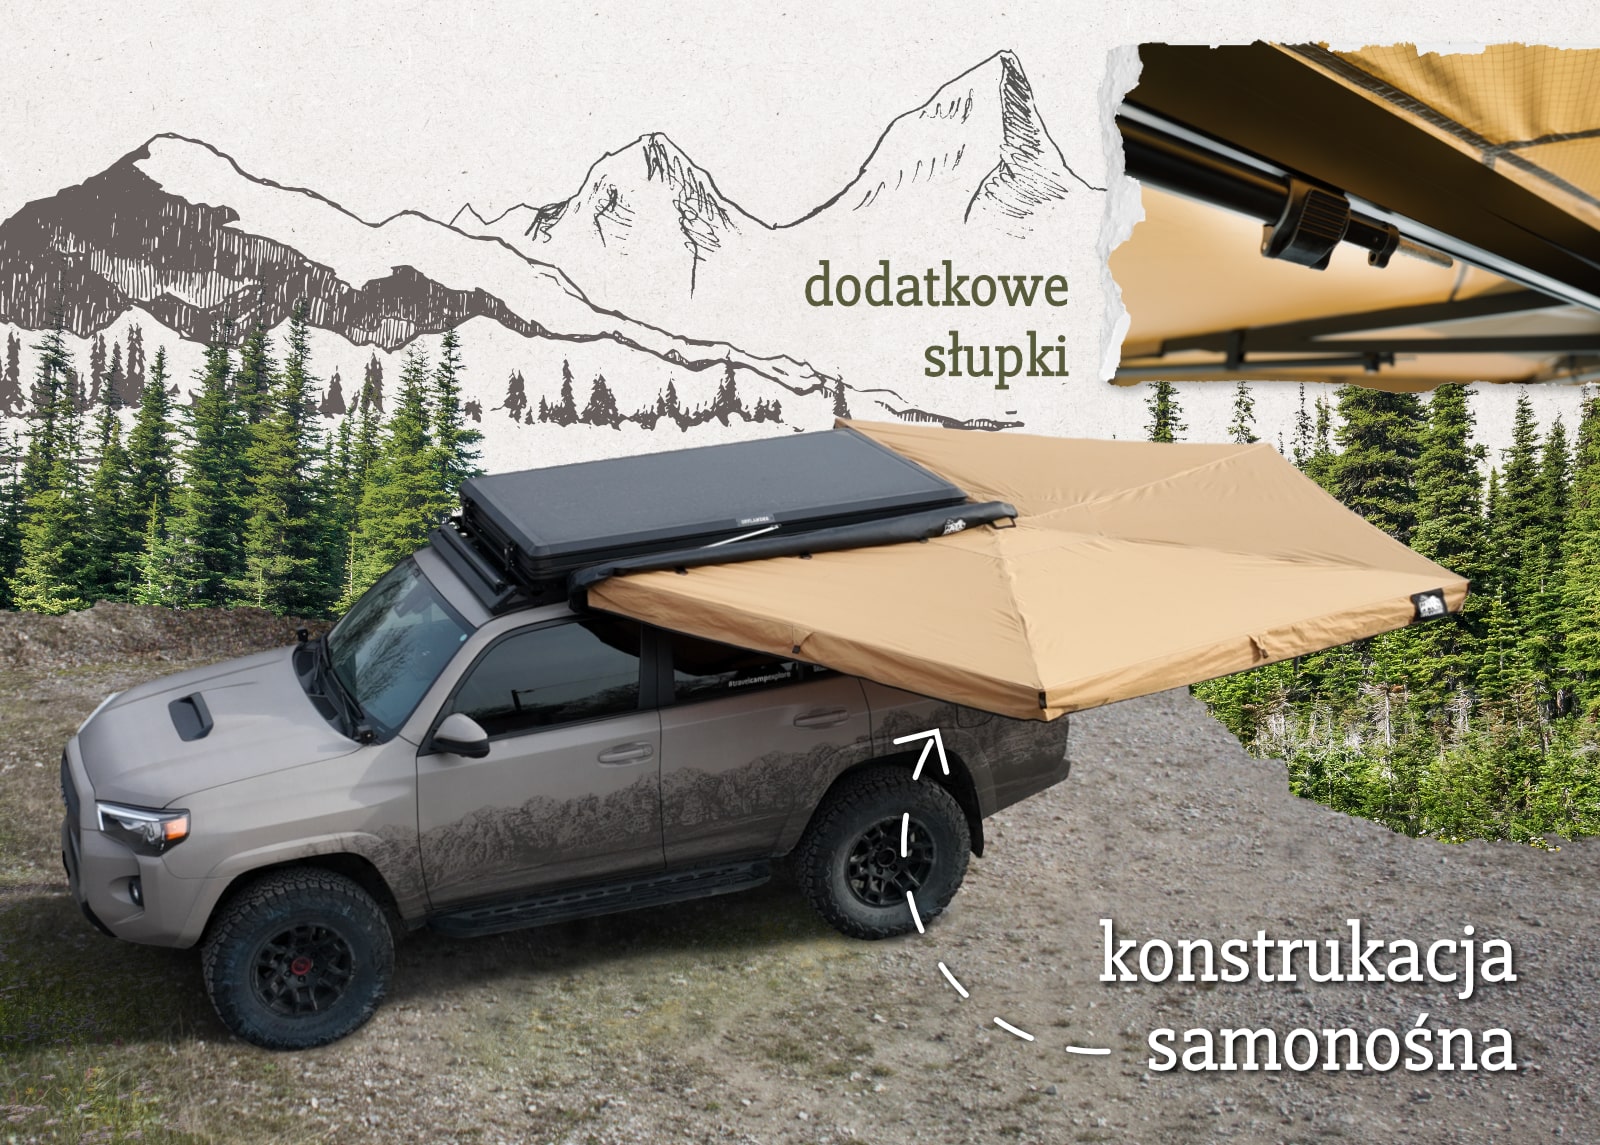
Solidna konstrukcja markizy wykonana jest z lekkich profili aluminiowych malowanych proszkowo co zapewnia trwałość i łatwość użytkowanie przez długie lata. BATWING wyróżnia się rozpiętością 270 stopni wokół samochodu, co daje osłonę na jednym z dłuższych boków samochodu i co ważniejsze jego tyłu. Tam zazwyczaj mamy dostęp do bagażnika czy też części zabudowy z kuchnią.
Markiza BATWING jest markizą samonośną, co oznacza, że może funkcjonować jako konstrukcja wolnostojąca, bez podpórek. W przypadku silnego wiatru lub deszczy należy ją jednak stabilizować dołączonymi czterema regulowanymi słupkami. Taki zabieg na pewno będzie potrzebny podczas deszczu tak aby odciążyć skrzydło markizy oraz odpowiednio odprowadzić wodę pomiędzy ramionami markizy. Słupki dołączone są na stałe do ramion. Dzięki temu zawsze są na swoim miejscu, a w przypadku nagłej ulewy nie musisz ich szukać, aby podeprzeć markizę.
Markiza jest składana i chowana w powiększony pokrowiec wykonany z trwałego PVC, który nie tylko chroni zadaszenie przed uszkodzeniami i zabrudzeniami, ale także ułatwia jego szybkie składanie i chowanie materiału w pokrowiec. Przewidzieliśmy dodatkowe miejsce wewnątrz pokrowca na słupki i mniejsze tarpy lub ściankę UNIWALL od OFFLANDER. Wszystko zmieści się bez problemu w pokrowcu. Luźniejszy materiał PVC nie hałasuje podczas podróży a na pewno ułatwia pakowanie.
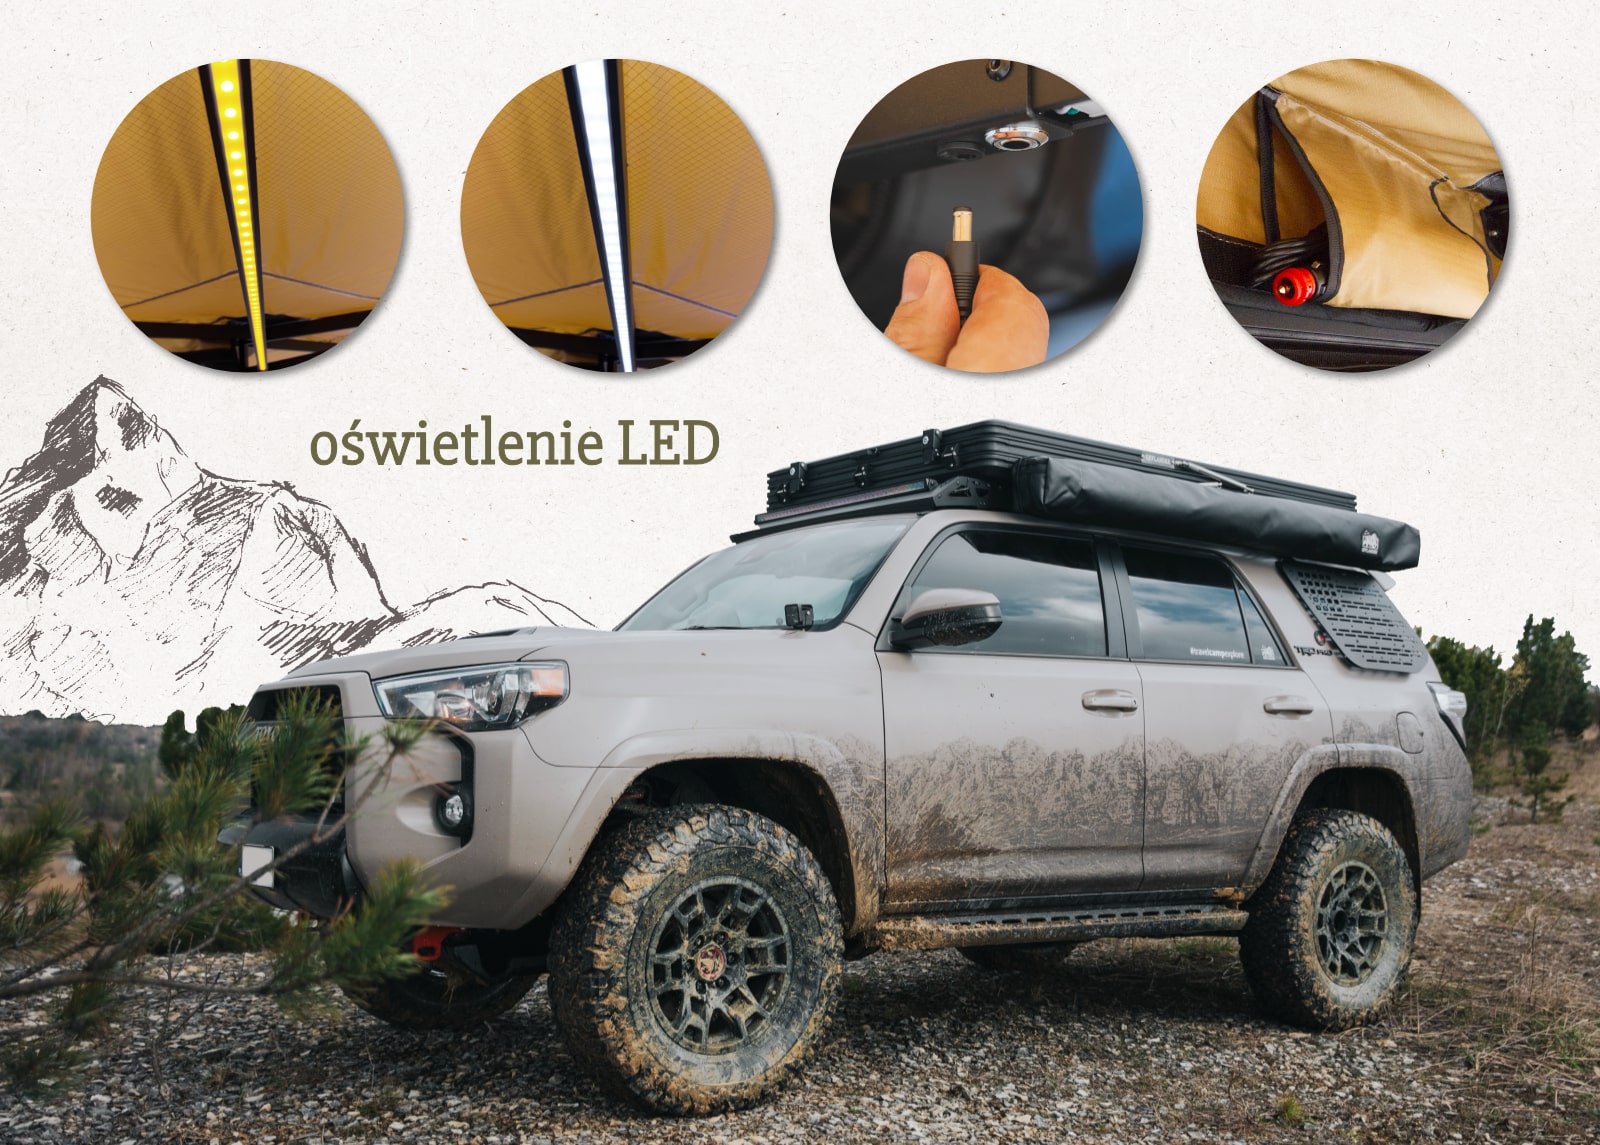
Ramiona markizy wyposażone są w dwa wpuszczone w ich konstrukcję paski LED. Zasilane gniazdem USB lub zapalniczki 12V wraz z wbudowanych przełącznikiem trybów. Do wyboru mamy trzy rodzaje światła: białe, pomarańczowe oraz mieszane. Takie rozwiązanie daje nam odpowiednie doświetlenie przestrzeni użytkowej i co ważniejsze przy użyciu światła pomarańczowego ogranicza ilość owadów, które przyciąga światło białe. Taka możliwość zmiany koloru światła na pomarańczowy to nie tylko kwestia estetyki, ale też praktyczne rozwiązanie minimalizujące ryzyko przyciągania komarów lub uwagi na biwakach incognito, co jest szczególnie przydatne podczas wieczornych campingów.
Składanie i rozkładanie BATWING jest proste i intuicyjne. Otwórz pokrowiec, rozciągnij skrzydło markizy, zabezpiecz i gotowe! Markizę można zamocować do poprzeczek dachowych lub platformy dachowej od strony kierowcy lub od strony pasażera, w zależności od modelu LEWY / PRAWY. W zestawie znajdziesz odpowiednie uchwyty do montażu do płaskich powierzchni takich jak platformy dachowe lub szersze beki dachowe. Mocowanie powinno być dobrze zamocowane do samochodu, aby uniknąć uszkodzenia podczas transportu. Rozłożenie zadaszenia bocznego nie wymaga dużego wysiłku, co czyni BATWING idealnym wyborem na wyjazdy i aktywności na świeżym powietrzu.
OFFLANDER TIP:
Markiza jest trochę jak parasol. Jak go masz to może Ci przeszkadzać, ale jak go nie masz i zacznie padać to jest koszmarnie. Tak jest z markizą, często nie jest otwierana na naszych długich czy krótkich wyprawach. Ale jak pogoda się psuje to jesteśmy szczęśliwi, że ją mamy. Ratuje nasze [i innych] łyki na biwakach. Tak, markiza to dodatkowa waga na dachu. Ale to kwestia przyzwyczajenia, szczególnie w podróżach typu overlanding , turystyk. My się bez niej nigdzie nie ruszamy.

Dane techniczne:
Wymiary: 200 cm (promień)
Waga: 22 kg
Wymiary pokrowca: 218 x 20 x 18 cm (dł. x szer. x wys.)
Sposób montażu: preferowany montaż do platformy dachowej za pomocą dołączonych uchwytów
W zestawie: 4 słupki, linka do zaczepienia końca markizy, 4 linki i 4 śledzie, 2 klucze do montażu
Kolor: khaki
Materiał wykonania stelażu: aluminium
Materiał wykonania: mieszanka bawełna + poliester Oxford 420D (PU 2000-3000)
Gwarancja: 2 lata
OFFLANDER – TRAVELCAMPEXPLORE
Poznając rynek namiotów, ludzi którzy żyją podróżowaniem i różnymi sposobami na eksplorowanie świata, zaczęliśmy planować coraz to dalsze wyprawy zarówno 4x4, jak i onroad, aby promować ten styl zgodnie z naszym sloganem #travelcampexplore.
Podróżujemy, biwakujemy, zwiedzamy i odkrywamy. Projektujemy nasze namioty, aby były funkcjonalne, trwałe oraz odpowiednio dopasowane dla każdego użytkownika i samochodu. Dbamy o jakość wykonania oraz odpowiedni serwis posprzedażowy. Wszystko w przystępnej cenie.
Dlaczego nasza marka to OFFLANDER?
Nazwa powstała z połączenia dwóch bliskich nam pojęć: offroadu i overlandingu. OFFROAD to wolność i niezależność, pokonywanie przeszkód, czasami brak planu czy spanie pod gwiazdami. OVERLANDING to z kolei podróżowanie bardziej zaplanowane, z rodziną i przyjaciółmi, biwaki na campingach, podróżowanie po drogach szutrowych, bez pokonywania trudniejszych przeszkód. Nowa nazwa ma nawiązywać do stylu podróżowania i nowego asortymentu, który z przyjemnością dla Was projektujemy.


Yes – in the vast majority of cases, as long as your vehicle can accommodate two crossbars or a roof rack/platform. The most common setups include:
Crossbars mounted on roof rails (e.g., Thule, Yakima systems, etc.).
Flat roof platform (rack).
Classic roof rack with a frame – if the rack is wider than the tent base, it’s worth adding an extra crossbar in line with the top of the frame to prevent the tent base from “sagging” in the middle and to allow it to open freely.
It’s best to have a few centimeters of clearance between the crossbar/platform and the roof surface – enough to comfortably fit your hand and a wrench when tightening the mounting brackets.
The make and body type of the vehicle are less important than the ability to safely position two solid support points. We install roof tents on city cars, SUVs, off-road vehicles, vans, and even camper vans.
The minimum spacing is approximately half the length of the tent’s base:
140 cm → min. 70 cm
160 cm → min. 80 cm
190 cm → min. 95 cm
The floor is reinforced with rails, so deviations are possible if necessary, but you should always follow the manufacturer’s instructions.
Short – less covered entrance, ladder outside the annex.
Long – more sheltered entrance, ladder inside the annex.
The sleeping area is the same in both versions.
Measure the height from the ground to the top surface of the crossbar/roof rack:
Up to 2.1 m → 2.3 m ladder
Over 2.1 m → 2.6 m ladder
Provide your vehicle model, the height to the mounting point, and the type of crossbars — we will select the right rooftop tent and accessories for you, and offer installation at Szekla4x4.
Contact details:
info@szekla4x4.pl
+48 534 600 534
By installing an additional layer of fabric as an inner wall (available from manufacturers), you can increase the perceived temperature inside by up to 10 °C.
A thermal blanket, the kind you can get at a pharmacy for about 6 PLN, will definitely help you warm up in an emergency.
An electric blanket or electric mat powered via USB or a car cigarette lighter has low power consumption while providing really nice warmth.
Parking heaters | Webasto – both the original and alternatives from other brands like Hcalory or Barracuda – run on diesel and electricity; you can run a warm air duct directly from them into the tent.
A warm sleeping bag – choose one that meets the thermal insulation parameters specified by the European standard EN 13537.
| Question | Hard Shell | Soft Cover |
|---|---|---|
| Setup and packing time? | Very quick – often just seconds thanks to gas struts. | Requires removing the cover and unfolding the frame – several minutes. |
| Durability and resistance? | Strong shell (plastic/aluminum/fiberglass); better protection from elements. | Fabric is more prone to wear and weather damage. |
| Aerodynamics and fuel consumption? | Lower profile, less wind resistance. | Higher profile, more wind drag, possibly higher fuel use. |
| Price and weight? | Usually more expensive and heavier; requires a solid roof rack. | Cheaper and lighter; easier to mount and remove. |
| Interior space? | Often more compact inside. | Usually more spacious and comfortable for multiple people. |
We will be happy to install any rooftop tent purchased from us in our workshop.
It’s important to first confirm the installation method and possibilities – please contact us in advance.
Email:** info@szekla4x4.pl
Phone: +48 534 600 534 (press 3, or press 1 if line is busy)
Q: Why does condensation form inside a rooftop tent?
A: When warm, moist air inside the tent meets the cold tent walls, condensation occurs. The greater the temperature difference, the more condensation will form.
Q: What external factors increase condensation?
A: High humidity in the air, such as during rain or fog, increases the amount of moisture that can accumulate and then condense inside the tent.
Q: How does poor ventilation contribute to condensation?
A: Without proper airflow, moisture gets trapped inside, causing water droplets to appear on the inner surfaces. Good ventilation reduces this effect.
Q: How can I reduce condensation inside the tent?
Use an anti-condensation mat under the mattress to act as a thermal barrier and absorb moisture.
Ensure proper ventilation by keeping vents slightly open, even in cold weather.
In humid conditions, consider using a portable dehumidifier.
Q: What is the dynamic and static roof load capacity?
A:
Dynamic load capacity – the maximum weight the roof can carry while driving.
Static load capacity – the weight the roof can support when the vehicle is stationary, often much higher thanks to the support from the ladder or the tent’s frame.
Q: Where can I check the roof load capacity?
A: You can find the values in the vehicle’s manual. If not listed, ask the manufacturer or dealer.
Q: What should I consider when installing a rooftop tent?
A: The total weight (tent + roof rack + gear inside) must not exceed the dynamic roof load capacity and the load capacity of the crossbars. This means everything on the roof while driving.
Concerns? We often hear: “If the dynamic roof load is only 100 kg, how can it support 4 people?” As explained above, the dynamic capacity refers only to the load while driving. When stationary, the roof can handle much more weight.
When the camping season comes to an end, it’s worth taking the time to properly prepare your rooftop tent for storage to extend its lifespan. The most important step is to thoroughly dry and air it out – this removes any moisture from the fabric and frame, helping to prevent mold, unpleasant odors, and material degradation.
How to store it?
The tent can be stored horizontally, vertically, or even suspended from the ceiling (e.g., in a garage). The exact orientation is not critical – what matters is that the tent does not come into contact with damp or bare concrete, which can promote moisture build-up and negatively affect its condition.
Storage conditions
Choose a space with a positive, stable temperature and low humidity. This will keep your rooftop tent in great shape and ready for the next season without additional maintenance.
A rooftop tent leaves the factory already well-protected – the fabric is treated with special coatings that provide effective resistance against water, wind, and other weather conditions. This means that a new tent does not require any additional waterproofing before its first use.
Over time, however, with regular and intensive use, the hydrophobic coating may gradually lose its effectiveness. It is therefore recommended to periodically check the condition of the fabric and, if you notice a decrease in water resistance, reapply a waterproofing treatment. Doing so will maintain optimal protection against moisture and significantly extend the lifespan of your tent.
Underfloor Storage – The Missisipi II includes a mesh organizer beneath the floor, perfect for keeping small gear neatly stowed. The Hudson does not feature this storage option.
Interior Lighting – In the Missisipi II, you can adjust the brightness of the built-in light to suit your needs. The Hudson’s lighting is basic, with only an on/off function.
Extra Ventilation – At the tent’s peak, the Missisipi II has two additional vents on each side, improving airflow throughout the interior. The Hudson lacks these extra vents.
Side Windows – The side openings in the Missisipi II are larger, providing more natural light and better ventilation compared to the Hudson.
Tent Shape – The Missisipi II features a rounded profile, helping reduce wind resistance and allowing rain to run off more easily. The Hudson maintains a more traditional, straight-lined design.
Window Above the Ladder – The awning over the entrance on the Missisipi II includes an extra window, allowing more daylight inside. This is not present on the Hudson.
Awning Support Mounting – On the Missisipi II, the awning support attaches to the upper part of the tent using Velcro straps, making it easier to prepare for transport. The Hudson uses a slot-in method between the tent’s fabric layers.
Protective Cover – The Missisipi II comes with a cover featuring compression straps that can be rolled and tucked under the floor once the tent is set up. The Hudson does not have this functionality.
Underfloor Gear Storage – The Kolorado II includes a handy mesh organizer located beneath the floor, perfect for keeping small essentials organized and within reach. The Ohio does not feature this storage option.
Lighting System – In the Kolorado II, the interior lighting comes with adjustable brightness, allowing you to set the perfect level for any situation. The Ohio offers a simpler on/off light without dimming capability.
Additional Ventilation – The Kolorado II is equipped with two extra vents on each side of the tent’s peak, improving airflow and reducing condensation. The Ohio does not have these extra vents.
Side Windows – The Kolorado II has noticeably larger side windows, letting in more daylight and boosting ventilation compared to the Ohio.
Tent Shape – With its rounded, aerodynamic profile, the Kolorado II handles wind better and sheds water more effectively. The Ohio features a straighter, boxier shape.
Protective Cover – The Kolorado II’s cover includes compression straps and can be rolled up and stowed under the floor once the tent is set up. This feature is not available on the Ohio.
Day & Night is an advanced multi-layer technical fabric designed to maximize comfort for rooftop tent users. Its specialized construction blocks up to 100% of sunlight, helping to keep the tent’s interior significantly cooler during the day.
Beyond heat control, this material also ensures complete privacy — even under strong sunlight — allowing you to enjoy peace and seclusion whenever you need it.
Perfect for hot summer days and bright early mornings, Day & Night fabric helps you sleep longer without being disturbed by light, creating an ideal environment for rest and relaxation.
How to Clean and Maintain Your Roof Top Tent
For regular cleaning, use a soft sponge or cloth together with lukewarm water and a mild cleaning solution — a gentle dishwashing liquid works well.
Avoid using a pressure washer, as the strong water jet can damage the fabric, weaken the seams, or strip away the protective waterproof coating. Always clean the tent carefully and without excessive scrubbing to preserve its durability and protective properties.
If you notice mold on the tent, we recommend using a dedicated mold remover, such as:
Anti-Mold and Mildew Cleaner Yachticon 500ml
Yes — every tent comes equipped with a foam mattress as standard, designed to provide comfortable sleep even on extended trips. Made from high-quality medium-firm foam, it contours to the body while offering reliable support throughout the night.
A key convenience is that the mattress can remain inside the tent when it’s folded down. This saves time during setup and takedown, while also freeing up space in your gear storage. All mattresses feature removable, washable covers, making it easy to keep them clean and fresh for every adventure.
To improve security and reduce the risk of theft, it’s worth installing anti-theft nuts or similar locking hardware. This is especially useful when parking in public areas or open spaces where the tent may be left unattended for extended periods.
If you’re planning a long break from using the tent, or it’s not currently needed, the safest option is to remove it from the vehicle and store it in a secure, enclosed location. This approach not only minimizes the chance of theft but also protects the tent from harsh weather and unnecessary wear.
The best security method will depend on your location, how often you use the tent, and your personal requirements.
Yes — a roof top tent can remain installed on your vehicle permanently, especially during the warmer months when it’s used frequently.
However, if you’re expecting a long break in use — particularly over the winter — it’s best to remove the tent and store it in a dry, well-ventilated location.
This approach helps prevent damage caused by harsh weather conditions such as snow, ice, excess moisture, or road salt. It also reduces the load on your vehicle’s roof, which can have a positive impact on fuel efficiency and overall vehicle condition.
For safe travel, it’s recommended not to exceed 120 km/h (about 75 mph) when driving with a roof top tent installed.
Higher speeds can affect the vehicle’s stability, increase fuel consumption and noise levels, and put extra strain on the tent’s structure due to strong air resistance.
Maintaining a sensible speed is one of the key factors for both comfort and safety, especially when carrying additional load on your vehicle’s roof.
Yes — a roof top tent can be mounted on a pickup truck, provided you use the correct crossbars or a dedicated platform designed to fit the vehicle’s structure and load capacity.
However, there is one very important rule: the tent must never be installed in a way that connects both the cab and the cargo bed. In pickup trucks, these two sections of the body move independently, especially when driving over uneven terrain. Rigidly linking them with a tent can create excessive structural stress, potentially damaging the tent, the mounting bars, the attachment points, or even parts of the vehicle’s bodywork.