tutorials
Yes – in the vast majority of cases, as long as your vehicle can accommodate two crossbars or a roof rack/platform. The most common setups include:
Crossbars mounted on roof rails (e.g., Thule, Yakima systems, etc.).
Flat roof platform (rack).
Classic roof rack with a frame – if the rack is wider than the tent base, it’s worth adding an extra crossbar in line with the top of the frame to prevent the tent base from “sagging” in the middle and to allow it to open freely.
It’s best to have a few centimeters of clearance between the crossbar/platform and the roof surface – enough to comfortably fit your hand and a wrench when tightening the mounting brackets.
The make and body type of the vehicle are less important than the ability to safely position two solid support points. We install roof tents on city cars, SUVs, off-road vehicles, vans, and even camper vans.
The tent is installed using four clamps that secure the rails in the tent’s base to the roof rack crossbars. The maximum crossbar width is usually around 78 mm (check the model specifications to be sure). Two crossbars and four mounting points are sufficient for stable use.
In some cases, you can purchase alternative mounting systems designed for specific roof rack models — for example, Rhino Rack, Rival, or Front Runner may offer their own dedicated solutions worth considering.
The minimum spacing is approximately half the length of the tent’s base:
140 cm → min. 70 cm
160 cm → min. 80 cm
190 cm → min. 95 cm
The floor is reinforced with rails, so deviations are possible if necessary, but you should always follow the manufacturer’s instructions.
Short – less covered entrance, ladder outside the annex.
Long – more sheltered entrance, ladder inside the annex.
The sleeping area is the same in both versions.
Measure the height from the ground to the top surface of the crossbar/roof rack:
Up to 2.1 m → 2.3 m ladder
Over 2.1 m → 2.6 m ladder
Provide your vehicle model, the height to the mounting point, and the type of crossbars — we will select the right rooftop tent and accessories for you, and offer installation at Szekla4x4.
Contact details:
info@szekla4x4.pl
+48 534 600 534
By installing an additional layer of fabric as an inner wall (available from manufacturers), you can increase the perceived temperature inside by up to 10 °C.
A thermal blanket, the kind you can get at a pharmacy for about 6 PLN, will definitely help you warm up in an emergency.
An electric blanket or electric mat powered via USB or a car cigarette lighter has low power consumption while providing really nice warmth.
Parking heaters | Webasto – both the original and alternatives from other brands like Hcalory or Barracuda – run on diesel and electricity; you can run a warm air duct directly from them into the tent.
A warm sleeping bag – choose one that meets the thermal insulation parameters specified by the European standard EN 13537.
| Question | Hard Shell | Soft Cover |
|---|---|---|
| Setup and packing time? | Very quick – often just seconds thanks to gas struts. | Requires removing the cover and unfolding the frame – several minutes. |
| Durability and resistance? | Strong shell (plastic/aluminum/fiberglass); better protection from elements. | Fabric is more prone to wear and weather damage. |
| Aerodynamics and fuel consumption? | Lower profile, less wind resistance. | Higher profile, more wind drag, possibly higher fuel use. |
| Price and weight? | Usually more expensive and heavier; requires a solid roof rack. | Cheaper and lighter; easier to mount and remove. |
| Interior space? | Often more compact inside. | Usually more spacious and comfortable for multiple people. |
We will be happy to install any rooftop tent purchased from us in our workshop.
It’s important to first confirm the installation method and possibilities – please contact us in advance.
Email:** info@szekla4x4.pl
Phone: +48 534 600 534 (press 3, or press 1 if line is busy)
FAQ: Why Does Condensation Form Inside a Rooftop Tent?
Q: Why does condensation form inside a rooftop tent?
A: When warm, moist air inside the tent meets the cold tent walls, condensation occurs. The greater the temperature difference, the more condensation will form.
Q: What external factors increase condensation?
A: High humidity in the air, such as during rain or fog, increases the amount of moisture that can accumulate and then condense inside the tent.
Q: How does poor ventilation contribute to condensation?
A: Without proper airflow, moisture gets trapped inside, causing water droplets to appear on the inner surfaces. Good ventilation reduces this effect.
Q: How can I reduce condensation inside the tent?
Use an anti-condensation mat under the mattress to act as a thermal barrier and absorb moisture.
Ensure proper ventilation by keeping vents slightly open, even in cold weather.
In humid conditions, consider using a portable dehumidifier.
Q: What is the dynamic and static roof load capacity?
A:
Dynamic load capacity – the maximum weight the roof can carry while driving.
Static load capacity – the weight the roof can support when the vehicle is stationary, often much higher thanks to the support from the ladder or the tent’s frame.
Q: Where can I check the roof load capacity?
A: You can find the values in the vehicle’s manual. If not listed, ask the manufacturer or dealer.
Q: What should I consider when installing a rooftop tent?
A: The total weight (tent + roof rack + gear inside) must not exceed the dynamic roof load capacity and the load capacity of the crossbars. This means everything on the roof while driving.
Concerns? We often hear: “If the dynamic roof load is only 100 kg, how can it support 4 people?” As explained above, the dynamic capacity refers only to the load while driving. When stationary, the roof can handle much more weight.
When the camping season comes to an end, it’s worth taking the time to properly prepare your rooftop tent for storage to extend its lifespan. The most important step is to thoroughly dry and air it out – this removes any moisture from the fabric and frame, helping to prevent mold, unpleasant odors, and material degradation.
How to store it?
The tent can be stored horizontally, vertically, or even suspended from the ceiling (e.g., in a garage). The exact orientation is not critical – what matters is that the tent does not come into contact with damp or bare concrete, which can promote moisture build-up and negatively affect its condition.
Storage conditions
Choose a space with a positive, stable temperature and low humidity. This will keep your rooftop tent in great shape and ready for the next season without additional maintenance.
A rooftop tent leaves the factory already well-protected – the fabric is treated with special coatings that provide effective resistance against water, wind, and other weather conditions. This means that a new tent does not require any additional waterproofing before its first use.
Over time, however, with regular and intensive use, the hydrophobic coating may gradually lose its effectiveness. It is therefore recommended to periodically check the condition of the fabric and, if you notice a decrease in water resistance, reapply a waterproofing treatment. Doing so will maintain optimal protection against moisture and significantly extend the lifespan of your tent.
Underfloor Storage – The Missisipi II includes a mesh organizer beneath the floor, perfect for keeping small gear neatly stowed. The Hudson does not feature this storage option.
Interior Lighting – In the Missisipi II, you can adjust the brightness of the built-in light to suit your needs. The Hudson’s lighting is basic, with only an on/off function.
Extra Ventilation – At the tent’s peak, the Missisipi II has two additional vents on each side, improving airflow throughout the interior. The Hudson lacks these extra vents.
Side Windows – The side openings in the Missisipi II are larger, providing more natural light and better ventilation compared to the Hudson.
Tent Shape – The Missisipi II features a rounded profile, helping reduce wind resistance and allowing rain to run off more easily. The Hudson maintains a more traditional, straight-lined design.
Window Above the Ladder – The awning over the entrance on the Missisipi II includes an extra window, allowing more daylight inside. This is not present on the Hudson.
Awning Support Mounting – On the Missisipi II, the awning support attaches to the upper part of the tent using Velcro straps, making it easier to prepare for transport. The Hudson uses a slot-in method between the tent’s fabric layers.
Protective Cover – The Missisipi II comes with a cover featuring compression straps that can be rolled and tucked under the floor once the tent is set up. The Hudson does not have this functionality.
Underfloor Gear Storage – The Kolorado II includes a handy mesh organizer located beneath the floor, perfect for keeping small essentials organized and within reach. The Ohio does not feature this storage option.
Lighting System – In the Kolorado II, the interior lighting comes with adjustable brightness, allowing you to set the perfect level for any situation. The Ohio offers a simpler on/off light without dimming capability.
Additional Ventilation – The Kolorado II is equipped with two extra vents on each side of the tent’s peak, improving airflow and reducing condensation. The Ohio does not have these extra vents.
Side Windows – The Kolorado II has noticeably larger side windows, letting in more daylight and boosting ventilation compared to the Ohio.
Tent Shape – With its rounded, aerodynamic profile, the Kolorado II handles wind better and sheds water more effectively. The Ohio features a straighter, boxier shape.
Protective Cover – The Kolorado II’s cover includes compression straps and can be rolled up and stowed under the floor once the tent is set up. This feature is not available on the Ohio.
Day & Night is an advanced multi-layer technical fabric designed to maximize comfort for rooftop tent users. Its specialized construction blocks up to 100% of sunlight, helping to keep the tent’s interior significantly cooler during the day.
Beyond heat control, this material also ensures complete privacy — even under strong sunlight — allowing you to enjoy peace and seclusion whenever you need it.
Perfect for hot summer days and bright early mornings, Day & Night fabric helps you sleep longer without being disturbed by light, creating an ideal environment for rest and relaxation.
How to Clean and Maintain Your Roof Top Tent
For regular cleaning, use a soft sponge or cloth together with lukewarm water and a mild cleaning solution — a gentle dishwashing liquid works well.
Avoid using a pressure washer, as the strong water jet can damage the fabric, weaken the seams, or strip away the protective waterproof coating. Always clean the tent carefully and without excessive scrubbing to preserve its durability and protective properties.
If you notice mold on the tent, we recommend using a dedicated mold remover, such as:
Anti-Mold and Mildew Cleaner Yachticon 500ml
Yes — every tent comes equipped with a foam mattress as standard, designed to provide comfortable sleep even on extended trips. Made from high-quality medium-firm foam, it contours to the body while offering reliable support throughout the night.
A key convenience is that the mattress can remain inside the tent when it’s folded down. This saves time during setup and takedown, while also freeing up space in your gear storage. All mattresses feature removable, washable covers, making it easy to keep them clean and fresh for every adventure.
To improve security and reduce the risk of theft, it’s worth installing anti-theft nuts or similar locking hardware. This is especially useful when parking in public areas or open spaces where the tent may be left unattended for extended periods.
If you’re planning a long break from using the tent, or it’s not currently needed, the safest option is to remove it from the vehicle and store it in a secure, enclosed location. This approach not only minimizes the chance of theft but also protects the tent from harsh weather and unnecessary wear.
The best security method will depend on your location, how often you use the tent, and your personal requirements.
Yes — a roof top tent can remain installed on your vehicle permanently, especially during the warmer months when it’s used frequently.
However, if you’re expecting a long break in use — particularly over the winter — it’s best to remove the tent and store it in a dry, well-ventilated location.
This approach helps prevent damage caused by harsh weather conditions such as snow, ice, excess moisture, or road salt. It also reduces the load on your vehicle’s roof, which can have a positive impact on fuel efficiency and overall vehicle condition.
For safe travel, it’s recommended not to exceed 120 km/h (about 75 mph) when driving with a roof top tent installed.
Higher speeds can affect the vehicle’s stability, increase fuel consumption and noise levels, and put extra strain on the tent’s structure due to strong air resistance.
Maintaining a sensible speed is one of the key factors for both comfort and safety, especially when carrying additional load on your vehicle’s roof.
Yes — a roof top tent can be mounted on a pickup truck, provided you use the correct crossbars or a dedicated platform designed to fit the vehicle’s structure and load capacity.
However, there is one very important rule: the tent must never be installed in a way that connects both the cab and the cargo bed. In pickup trucks, these two sections of the body move independently, especially when driving over uneven terrain. Rigidly linking them with a tent can create excessive structural stress, potentially damaging the tent, the mounting bars, the attachment points, or even parts of the vehicle’s bodywork.
The performance figures given by winch manufacturers represent the maximum capabilities, not the working load. These values are measured under ideal conditions – without slopes, terrain obstacles, or other real-world challenges. The highest pulling power is achieved on the first layer of rope on the drum.
For safety – both yours and the equipment’s – the load on the winch should not exceed about 80% of its maximum rated capacity.
When selecting a winch, start by determining the total weight it will need to handle. You can use the vehicle’s gross weight rating as a reference, but remember to allow extra for additional cargo (e.g., a fully loaded van), difficult terrain (e.g., the vehicle hung up on the chassis), or damage that increases resistance (e.g., a missing wheel).
Once you have that figure, multiply it by at least 1.5 as a safety margin, or check the manufacturer’s specifications for the winch’s pulling power on the last layer of rope. This will give you a realistic figure for choosing the right model.
If you’re unsure which winch is right for you – get in touch, and we’ll help you find the perfect fit.
Steel rope has long been the standard choice for winches. Made from multiple strands of carbon steel wire, it offers excellent resistance to abrasion and generally comes at a lower cost than synthetic alternatives. Its main drawback is the tendency for individual wires to break over time, creating sharp burrs – meaning gloves are essential for safe handling.
Synthetic ropes, introduced to the market much later, are dramatically lighter – often up to ten times lighter than steel. Despite the lower weight, they can be incredibly strong, with some models offering breaking strengths up to seven times higher than comparable steel ropes. An often-overlooked advantage is that synthetic rope floats on water, making it extremely useful during river crossings and wet off-road conditions.
Unlike steel, synthetic rope doesn’t snap violently. It’s more flexible, and if damaged, it can be repaired in the field simply by tying a knot. This makes it a much safer option to use. On the downside, synthetic ropes cost more and are more susceptible to abrasion. However, for those willing to invest, they offer unmatched convenience and performance in challenging terrain.
Steel cable has been the go-to choice for winches for decades. Made from multiple strands of carbon steel wire, it offers excellent resistance to abrasion and is typically more affordable than synthetic rope. However, individual wires can break over time, creating sharp burrs – which is why protective gloves are a must when handling it.
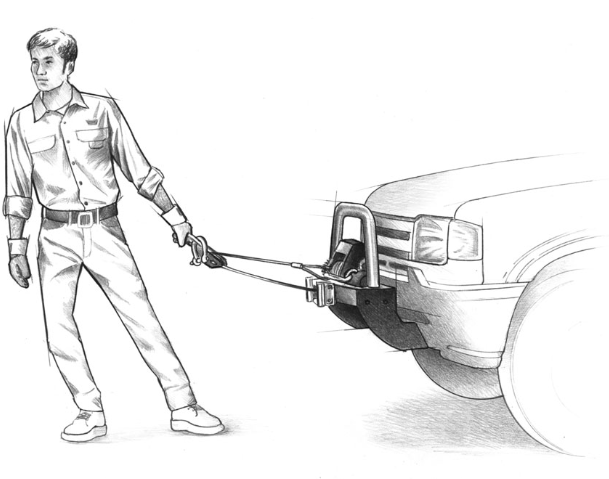
Proper preparation is essential before operating a winch. Avoid loose clothing or jewelry that could get caught in moving parts. If you have long hair, tie it back securely. Never handle a steel cable with bare hands, and always keep a safe distance – a snapped cable can behave unpredictably.
Before each use, inspect the winch to ensure it’s in good working order. Whenever possible, pull in a straight line. If you need to work at an angle, use a snatch block to guide the cable and reduce strain. Keep an eye on how the cable winds onto the drum – it should spool evenly. Avoid bunching in one area or letting it pinch between earlier layers. If it jams, unwind and rewind the cable properly.
Manual spooling should only be done after disengaging the gearbox (by turning the lever) and never when the winch is under load or running, as this can damage the mechanism. Snatch blocks are also helpful for increasing pulling capacity when needed.
When anchoring to a tree, never wrap the cable directly around the trunk – use a tree saver strap instead. Always leave at least eight wraps of cable on the drum when pulling to prevent damage to the anchor point and ensure safety. Keep the cable under light tension during operation to avoid kinks and tangling.
While using the winch, keep the vehicle’s engine running to prevent battery drain. Check the battery condition regularly. A new winch is factory-lubricated and doesn’t need immediate servicing, but it does require periodic maintenance. This includes disassembling the unit, cleaning it, replacing grease, and swapping worn parts. Steel cables should also be lubricated periodically with a suitable penetrating oil.
The answer is simple – the fewer wraps on the drum, the more pulling power the winch can deliver. The exact amount of rope you can fit depends on the drum size. For example, a standard 12,000 lbs winch can typically hold about 28 m of 10 mm cable, or around 25 m if you go up to 12 mm. With these lengths, you need to pay close attention to how the rope is spooled to avoid pushing apart the crossbars that support the winch’s legs.
In a winch, the gear ratio describes the relationship between the number of turns of the winch’s motor and the number of turns of the drum. In simple terms, it tells you how much the motor has to spin to rotate the drum once.
A higher gear ratio means more mechanical advantage – the winch can pull heavier loads but will do so more slowly. A lower gear ratio allows faster line retrieval but with less pulling power. Manufacturers choose gear ratios to balance speed, torque, and efficiency for the intended use of the winch.
A battery isolator switch (often called a “kill switch” or “master switch”) is a safety device installed in the power circuit of your winch. Its job is to completely cut off the electrical connection between the winch and the vehicle’s battery when the winch is not in use.
Why is it important?
Safety – Prevents accidental winch activation.
Fire protection – Eliminates the risk of electrical short circuits when the winch is idle.
Battery preservation – Stops slow battery drain from standby power.
When choosing a battery isolator for a winch, pick one that can handle the high current your winch draws under load. For most 12V winches rated around 9,000–12,000 lbs, you’ll want a switch rated for at least 250–500 amps continuous loadand even higher for peak loads. Heavy-duty marine or off-road-specific isolators are usually the best choice.
A winch is just the starting point. To get the most out of it – and to ensure the safety of both your gear and everyone involved – it’s worth investing in a few key accessories.
1. Battery Isolator Switch (Kill Switch)
Allows you to quickly cut power to the winch, preventing accidental activation or electrical short circuits.
2. Snatch Block
Increases your winch’s pulling power and lets you change the pulling direction. Essential for angled pulls or when working with particularly heavy loads.
3. Tree Saver Strap
Protects the bark and structure of a tree when it’s used as an anchor point.
4. Shackles and Thimbles
Strong connection points for attaching the rope to straps, hooks, or other recovery gear. Opt for high-quality steel or aluminum models with certified load ratings.
5. Protective Gloves
An absolute must for working with steel cable, and highly recommended for synthetic rope as well – they protect your hands from cuts, abrasion, and rope burns.
6. Winch Line Damper
Placed over the rope during operation, it reduces recoil if the line snaps, increasing overall safety.
7. Rope or Strap Extension
Provides extra reach when the nearest anchor point is farther than your rope’s standard length.
8. Recovery Gear Bag or Organizer
Keeps all your equipment in one place, protected from dirt, moisture, and damage.
With the right accessories, your winch becomes a versatile and safe recovery tool – ready for anything from a light assist to a heavy-duty off-road rescue.
Choosing the right winch for a car trailer depends mainly on the weight of the vehicles you plan to load. The most important factor is pulling capacity – as a rule of thumb, it should be at least 1.5 times greater than the gross weight of the heaviest vehicle you’ll be pulling.
Key factors to consider when selecting a trailer winch:
Rated pulling power – For standard passenger cars, a 4,000–6,000 lbs winch is usually sufficient. If you often load SUVs or vans, go for 8,000–12,000 lbs.
Rope type – Steel cable is more resistant to abrasion and less expensive, but requires gloves for safe handling. Synthetic rope is lighter, safer if it snaps, and easier to work with.
Line speed – Faster winches make loading more efficient, which is important for commercial use.
Power supply – Most trailer winches are 12V and connect to the towing vehicle’s battery; in some cases, a 24V system may be worth considering.
Mounting style – The winch can be permanently fixed to the front of the trailer or mounted on a plate for quick removal.
Control method – Wired remotes are highly reliable, while wireless remotes add convenience.
Example selection:
If you mainly load passenger cars up to 1.5 tons, a 4,500–6,000 lbs winch will be sufficient. For vehicles over 2 tons, a 9,000–12,000 lbs model is a safer choice, giving you enough power for difficult situations (e.g., a car with seized wheels).
After a demanding off-road outing or rally, it’s a good idea to give your winch a thorough inspection. This should include:
Replacing the planetary gear grease – If the grease shows signs of water contamination, replace it immediately. Under normal use, change it every two years. Use waterproof grease, such as lithium-based grease.
Checking the motor brushes and bearings – Replace any worn components to keep the motor running smoothly.
Inspecting the brake shafts and O-rings – Swap them out if they show wear or damage.
Cleaning and tightening all electrical connections – Pay attention to the control box, motor terminals, and battery clamps.
Maintaining the winch rope – Replace it if necessary; remember, ropes often wear out faster than the winch itself.
Inspecting, greasing, and replacing drum bearings – Ensure smooth operation and prevent premature wear.
Important: Do not attempt to “seal” the winch with silicone or similar products. Such sealing can trap water inside (in the motor, gearbox, or brake) when the winch gets wet, leading to corrosion and damage.
It’s the maximum load that a piece of equipment (like a strap, shackle, rope, or chain) is rated to handle during normal use. This value is set by the manufacturer based on safety factors, meaning the actual breaking strength of the equipment is higher, but you should never exceed the WLL in real-world operation.
Example: If a recovery strap has a WLL of 5 tons, it means you can safely use it for loads up to 5 tons under normal conditions.
The WLL is usually calculated as Breaking Strength ÷ Safety Factor. For lifting gear, the safety factor might be 4:1 or higher; for recovery gear, it can vary.
Key point: WLL is about safe working capacity, not the maximum it can physically hold before failure.
A marking such as 3 / 21 T on a recovery strap usually means:
3 T – the WLL (Working Load Limit) or safe working load of the strap. This is the maximum load that can be safely applied during regular use.
21 T – the breaking strength (also called ultimate strength or minimum breaking strength), which is the load at which the strap will fail in a controlled test.
In this example, the strap is rated for safe use at 3 tons, but in a laboratory test, it can withstand up to 21 tons before breaking. The difference between the two numbers comes from the safety factor applied by the manufacturer – in this case, 7:1 (21 ÷ 3 = 7).
Key point:
You should always work within the lower number (WLL) to maintain safety and prolong the life of your recovery gear. The higher number is there to indicate its ultimate tested strength, not the load you should use in real-world recovery.
1. Why choose synthetic rope over steel cable?
Improved safety – when it breaks, it doesn’t store as much kinetic energy as steel, reducing the risk of injury.
Lightweight and easy to handle – often several times lighter than steel, with no sharp burrs to worry about; easier to spool in and out.
Field repairability – damaged rope can be rejoined or spliced without specialized equipment.
It floats – ideal for water crossings and wet environments.
Cons: more expensive, more vulnerable to UV exposure and dirt, and requires regular maintenance.
2. How to choose the right diameter and length?
Safety margin – rope strength should be at least 1.5–2 times higher than your winch’s maximum rated pull.
Balance between diameter and length – thicker rope is stronger but takes up more drum space; sometimes a shorter main rope with an extension is the best option.
Avoid overfilling the drum – too much rope can damage winch components and reduce pulling efficiency.
3. What are the best materials for synthetic winch ropes?
Commonly made from HMPE fibers (such as Dyneema), polyester, or nylon – all highly resistant to moisture, corrosion, and offering exceptional strength.
Rope construction (e.g., 12-strand braid) affects durability, abrasion resistance, and how easily it picks up dirt.
Various winching situations
may require the use of different winching techniques.
This could include situations such as too short a distance to achieve maximum pull using a straight-line setup,
or the need to increase pulling power or maintain the rope in a straight-line pull.
You must assess which technique is appropriate for your situation.
Always remember to think safety first.
How to change pulling direction? This is also where a snatch block comes in
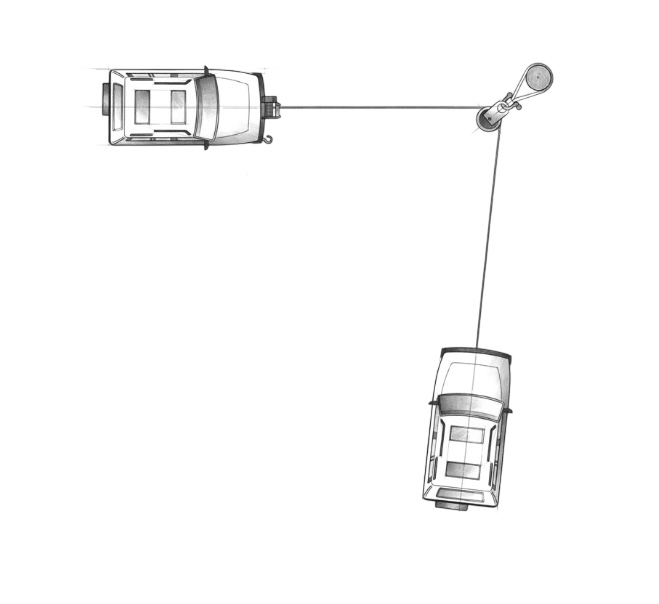
When winching, it’s best to keep the rope running in a straight line from the winch to the object being pulled. This ensures even spooling on the drum, improves efficiency, and reduces the risk of rope damage.
Using a snatch block attached to a point directly in front of the vehicle allows you to change the pulling direction while keeping a 90° angle between the rope and the drum. This ensures the rope spools properly during operation.
A snatch block can also increase pulling power
In some situations, you may find you need more pulling power.
Using a snatch block provides mechanical advantage, which directly translates into increased winching power.
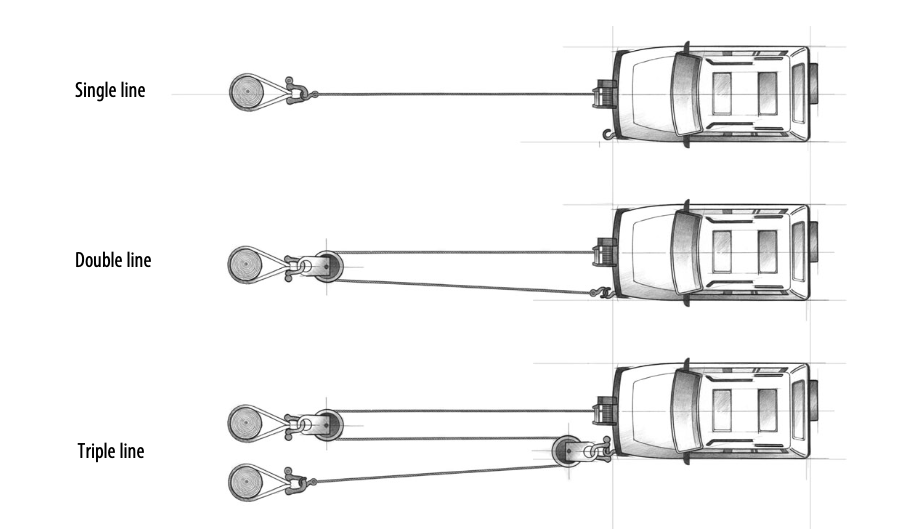
Double line
Winch pulling power decreases as the number of rope layers on the drum increases.
Using a snatch block in a double-line setup allows you to pull out more rope from the drum, reducing the number of layers and increasing pulling power.
Step-by-step:
Spool out enough winch rope to free the hook.
Attach the hook to the vehicle’s frame or tow point, then pass the rope through the snatch block.
Disengage the winch clutch and, using the snatch block, pull out enough rope to reach the anchor point.
Do not attach the hook to the winch mounting bracket.
Secure the rope to the anchor point using a tree saver strap or a choker chain.
Attach a shackle to both ends of the strap or chain, making sure not to overtighten – tighten and then back off half a turn.
Triple line
Similar to the double-line setup – as shown in the diagram – except the rope end is routed through two snatch blocks, with the third point being, for example, a tree.
What is a roller fairlead for a winch?
A roller fairlead consists of four steel or aluminum rollers that guide the rope during winching. It is mainly used with steel cables because it reduces friction and prevents excessive wear when winching at an angle.What is a hawse fairlead?
A hawse fairlead is a smooth plate, usually made of aluminum or steel, with a rounded opening through which the rope passes. It is designed specifically for synthetic ropes – minimizing wear and protecting them from abrasion.Which option is better for synthetic rope?
For synthetic rope, a hawse fairlead is strongly recommended because:
It has a smooth surface that won’t damage the rope fibers.
It has no moving parts that could pinch or fray the rope.
It’s lighter and more compact than a roller fairlead.
Can you use roller fairleads with synthetic rope?
Yes, but only if they are in perfect condition – with no sharp edges, rust, or pitting. Even minor damage to the roller surface can cut or weaken synthetic rope.Can you use a hawse fairlead with steel cable?
It’s not recommended. Steel cable combined with a hawse fairlead generates more friction, wears it out faster, and can cause serious damage when winching at an angle.
YES, please contact us to arrange the installation location.
Tel: +48 534 600 534 (please select option 3)
Email: info@szekla4x4.pl
YES, please contact us to arrange time when to do it.
Tel: +48 534 600 534 (please select option 3)
Email: info@szekla4x4.pl
YES, please contact us to arrange the installation date.
Tel: +48 534 600 534 (please select option 3)
Email: info@szekla4x4.pl
YES, please contact us to arrange the installation date.
Tel: +48 534 600 534 (please select option 3)
Email: info@szekla4x4.pl
YES, please contact us to arrange the installation date.
Tel: +48 534 600 534 (please select option 3)
Email: info@szekla4x4.pl
YES, please contact us to arrange the installation date.
Tel: +48 534 600 534 (please select option 3)
Email: info@szekla4x4.pl
YES, please contact us to arrange the installation date.
Tel: +48 534 600 534 (please select option 3)
Email: info@szekla4x4.pl
YES, please contact us to arrange the installation date.
Tel: +48 534 600 534 (please select option 3)
Email: info@szekla4x4.pl
YES, please contact us to arrange the installation date.
Tel: +48 534 600 534 (please select option 3)
Email: info@szekla4x4.pl
YES, please contact us to arrange the installation date.
Tel: +48 534 600 534 (please select option 3)
Email: info@szekla4x4.pl
A 2.5-inch lift is the optimal choice — it allows for fitting larger tires while maintaining ride comfort.
Springs starting from 3.5 inches are stiffer to support the vehicle’s height. Unfortunately, this stiffness limits overall comfort, even with high-quality shocks.
A kinetic rope stretches and releases stored energy, making vehicle recovery easier and smoother. A standard tow rope transfers the pulling force directly, without shock absorption.
No — it provides a safe strength margin. In off-road conditions, real recovery loads are often much higher than the vehicle’s actual weight.